Sidewalk pie.
Mmmm, good ol’ Sidewalk Pie.
Wait, what? Sidewalk Pie?
What the heck is Sidewalk Pie, and, why is it called Sidewalk Pie, you ask?
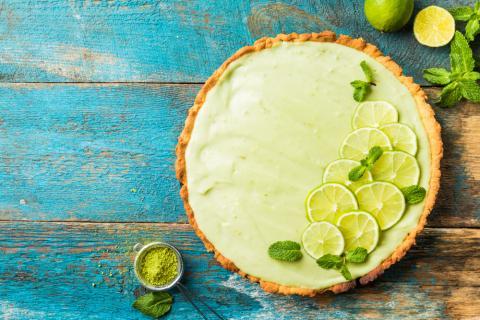
It’s actually a Raw Key Lime Pie. And—this pie is so good, you could eat it off the sidewalk.
In fact, I and my friends actually did eat this pie off the sidewalk. This is not an exaggeration, figure of speech, or hyperbole. That’s just how dang good this pie is.
The Story
The true story of it is: this summer, my boyfriend, his kids, and I were on our way from one Sunday barbeque to the next, and in addition to bringing some amazing gluten-free chocolate chip cookies that I had made, I also brought a raw key lime pie that I had made the day before. I have made a number of versions of this pie, and, for whatever reason, this one was the best yet.
The people at our first BBQ ate all of the gluten-free cookies, but I still had half of this raw key lime pie left when it was time to leave for our next gathering. (All those that tried the pie loved it, but others were not sure what they were looking at and opted for the more-familiar-looking cookies first, making that their one dessert of the event.) I decided that rather than leaving the rest of this pie behind, I wanted to make sure my friends at the second BBQ could get some, as I knew the friends at the second gathering were way more into natural, raw, and whole foods-type of dishes and would be extra appreciative of the pie.
One interesting thing about the raw pie (aside from the fact that it is indeed a "raw" pie) is that it is made in a springform pan, which helps it to form and keep its shape when in the refrigerator phase of its “baking.” Once the pie is ready, all you have to do is release the springform shape and voila! You have yourself a ready-to-eat and round pie, with no need to scrape the sides of the pan.
That said, when we were walking from the car to our next gathering, I was holding the pie from the bottom (waitress-style) and didn’t realize that the springform pan latch was already released, and somehow the bottom of the pan (with the pie stuck to it) flew up and out of my hand, flipped upside down in the air, and landed face-down on the sidewalk. I stood there for a few seconds in shock, just staring at the mess on the sidewalk. My boyfriend and his three sons stood by empathetically, waiting for my reaction, seemingly terrified to say a word. I think the first sentence out of my mouth was simply, “Oh man. That’s $20 worth of pie right there.” (Since raw pies are made out of 100 percent whole foods and organic ingredients including nuts, dates, and other healthy and delicious foods, the cost can be a bit more than your average pie, but, it is also so filling, nutritious, and wholesome that it is totally worth it, and is more like a meal than a dessert, depending on the pie.)
Anyhow, I waited about 10 seconds, and decided that though the pie was currently a mushy lump on the sidewalk, it was worth salvaging, and went with the “10-second rule.” I used the bottom of the springform pan, and managed to scrape the majority of the pie onto it—leaving the parts of the pie touching the sidewalk where they were, and brought it in.
I arrived at the BBQ, presented the pie to my friends (a married couple, their daughter, and another guest) and told them its story so they could make an informed decision about consuming it. They laughed, and looked skeptical for a moment or two, but then decided to try it.
Not only did they love it, but they asked if I could leave the rest of it for them, and one of my friends in particular proceeded to text me throughout the week telling me how she was supplementing her lunch all week with this pie and how good it is, and sometimes asking “if she was gross” for eating a pie that came off the sidewalk. I responded with a resounding “nope” and smiled, knowing just how good this pie was, and how happy it was making everyone that ate it.
And from there, decided to name it “Sidewalk Pie.”
And—this pie is raw, vegan, vegetarian, gluten-free and paleo-friendly (low-glycemic). It is good anytime of year, but is particularly good in the summertime, as it is light and refreshing.
Oh, and—in all of my experimentation with raw key lime pies over the years, I realized that this one was the best yet due to the high ratio of crust to pie (lots of crust, yum!).
Ray Key Lime Pie (Sidewalk Pie)
The filling calls for a scoop of protein powder. I used bone broth protein as I am a paleo-centric gal, but use any no-flavor protein powder—especially if you want this pie to remain vegan/vegetarian. Or—leave the protein powder out entirely, as there is plenty of protein in this pie with all of the nuts! But, if you want to “beef” it up, bone broth protein powder or other types can make it even more of a meal/protein snack.
Crust Ingredients
- 3 cups walnuts
- 2 cups medjool dates, pitted (of course!)
- 1 teaspoon vanilla extract
- 1/8-1/4 teaspoon of fine pink Himalayan salt (to taste)
Crust Directions
- Make the crust first, blending all of the above ingredients in a food processor until a dough-like consistency is achieved. Keep your eye on it, because a few seconds too many, and this concoction will turn into nut-butter.
- Press the “dough” into an ungreased springform pan into a flat circle, and place the pan into the freezer for half an hour (or longer is okay).
- Wash the food processor to get it ready for the filling.
Filling Ingredients
- 1-1/4 cup cashews ***soaked overnight***
- 1 cup dates
- 1 Tablespoon melted coconut oil
- 1 Tablespoon honey (or agave or other liquid vegan sweetener)
- 2-6 Tablespoons lime juice to taste (when I started making this, I started with 2 Tablespoons, but eventually went as high as 6 Tablespoons and liked that for a more lime-y taste).
- 1/4 teaspoon pink Himalayan salt
- 1 scoop protein powder
Filling Directions
- Place all of the filling ingredients into the (clean) food processor, and pour the mixture onto the frozen crust.
- Cover the pan and freeze the pie for at least 2 hours.
- Serve when ready, and it is probably a good idea to take the pie out of the freezer about 20 minutes before you want to serve.
- When/if there is any pie left after serving, you can keep the pie in the fridge or freezer, depending on how long you think it will go uneaten. (Not long if it’s in my house.)