What’s a spore print? Well, first, mushroom spores are how mushrooms reproduce. They are usually released from the underside of a mushroom cap. But spores are too small to see individually with the naked eye. When you make a spore print, you essentially get a big pile of spores so you can see what color they are.
Spore Prints for Mushroom Identification
Why in the world would someone want to make a spore print? One of the two main reasons is because mushroom foragers such as myself want to be sure of the identification of a mushroom. Spore color is one important factor in identification; it can prevent someone from making a potentially deadly mistake when foraging for edible or medicinal mushrooms. Consider, for instance, a tasty edible called Horse Mushroom (Agaricus arvensis, scientifically-speaking). Horse Mushroom has a white cap and stalk and there is a white membranous ring around the stalk. Horse Mushroom also has gills under the stalk. (If you’ve ever looked at the underside of a Portabella mushroom, then you know what gills look like.) The problem? There are other mushrooms with a white cap and stalk, a ring around the stalk, and gills under the cap. For example, deadly Destroying Angel Amanitas. But Horse Mushroom will have a brown spore print while a Destroying Angel will have a white spore print. (They also have different gill coloration...).
Sometimes spore prints are actually for trying to grow a mushroom. The print is a way to collect and store spores for growing later. I’m not going to get into how to do this because it’s a bit more complicated than the standard spore print.
Spore Prints for Art
The other main reason for making a spore print is because they’re beautiful! You can make spore-print art: Cards, posters, collages, wherever your creativity takes you.
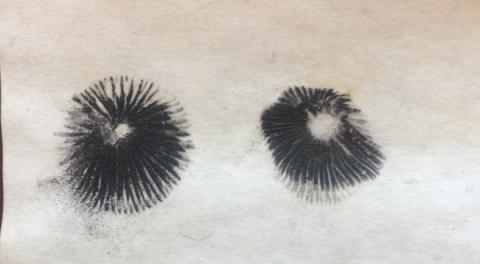
Different mushroom species have different colored spores—white, rust, salmon, cream, olive, brown, black, etc.—so you can make colorful spore print collages. You can also play around with spore print size and shape using different mushroom species. For example, many mushrooms will give you a round spore print, while others may be more irregularly-shaped, like Oyster Mushrooms, or crescent-shaped like shelf mushrooms.
You can also play with spore print patterns. “Gilled” mushrooms make a spore print with a gilled pattern: A bunch of straight or somewhat straight lines radiating out from the center of the print. Some mushrooms release their spores from little holes called pores under the cap, rather than from gills. Others have tooth-like structures under the cap that release the spores. So, these prints will all look different.
How to Make a Spore Print
It’s easy! For mushrooms with a cap and a stalk, pop the stalk off without damaging the cap. Place the cap bottom-side-down on a flat surface. This may be a piece of paper, cardboard, aluminum foil, or maybe a piece of glass or wood. For mushrooms that don’t have a stalk, like shelf fungi that grow out of the sides of trees or logs, just be sure to place the side that was facing the ground down on your surface. Place a bowl over the mushroom. Let it sit for a few hours to a day or two. Putting a drop of water on the cap may improve spore release.
I often do prints on white paper, but this isn’t useful when looking for white spores. Same idea with black paper. Some folks do the print half on white and half on black paper, with the paper’s taped together underneath. Aluminum foil and clear glass are good options because they’ll work for very light or very dark spores.
Hard mushrooms like shelf fungi can be more challenging because they actually last a long time. The one you’ve found may be too young or too old to make spores. Or it may make spores slowly. Wrapping the shelf fungus in a wet cloth overnight before trying to make a spore print may help with spore production. It’s an attempt to mimic the dampness from a rain to fool the mushroom into sporulating.
Once you have a spore print, you can preserve it with artist’s fixative spray, but hold it a foot above the spore print and don’t add too much or you’ll ruin the print. I like to store mine in plastic sleeves in a binder or art portfolio. Or you can put them in a box where they’re protected from light. Or, better yet, frame them!