To heal this fall, just work with your hands. Here are some cool DIY ideas of bottle art.
Parties and get-togethers are great fun, but the cleaning up the morning after is so not! Chances are you have a stack of wine and beer bottles you’re wondering how to reuse. The first thought is obvious; just chuck them into the local recycling plant where old bottles can safely be turned into environmentally-conscious reusable things, or even more bottles.
But if your hands are a bit itchy and needing to do something with these at home, and since it is a proven fact that making something with our hands is a healing process – then here are 8 awesome DIY ideas that can be done with minimal to little effort that make great centerpieces as well as awesome gifts to give!
It’s always time for some tipple
If you’ve ever had a BYOB party, then your recycling shelf is likely holding empty bottles of many different brands of beer and wine. So here’s (picture) a cool idea that can really up the interesting quotient of your wall as well as give a plain old clock a makeover, with a kick. Or you can always make this from scratch, depending on the materials you have at hand. Simple wooden slats would work best, which you can then insert and affix onto a wooden frame. Make sure you keep this base roomy enough to fit 12 beer pints. Now select your 12 pint bottles and make sure they are roughly the same size and shape; wash them well to ensure all odors and moisture have been removed. Arrange them in a circular shape with the mouth of the bottle pointing outwards. Glue them firmly in place with a heavy duty adhesive such as LiquidNails (you can select the right kind of adhesive here). Finally, add in a clock at the center of the beer circle and some hooks at the back to hang your tipple time teller in place.
Twine it up for some show
A really simple but really cool showpiece or even dry-flower vase idea is to cover your tipple or wine bottles in nothing more than colorful twine or wool (picture). Choose the color, pattern and kind of twine you’d like to begin with and keep a few tubes of strong silicon-based adhesive on hand.
Make sure the bottles are clean and dry. Begin at the base of the bottle – start by applying a dot of adhesive at the center of the base and glue the twine end there. Now start making concentric circles with the twine, gluing each bit to the glass as you go long. Once the base is covered, move the twine towards the side of the bottle and keep twining the cord around the bottle. Make sure you apply liberal adhesive to the glass to get the twine to stick and stay. Add on decorations as you like.
Make a recycled soap dispenser
No – this is not a beer or wine bottle as any JD fan would clearly know. That said, it’s such a kickass idea that we did not want to miss it. For everyone bored with the plastic soap dispensers that many brands come packaged in, or equally jaded with the store-bought ones – here’s a fantastic idea that will make everyone visiting your bathroom do a double take.
Make sure you have a Jack Daniels bottle at hand. If it’s empty, good. If it’s not, even better. Have a party, drink the booze and then work through your hangover by making this treasure for your bathroom. All you need to do is fill up the empty bottle with liquid soap in a color not particularly reminiscent of the JD elixir. Now just screw on the fanciest pump you can find (with the tubing and all) and voila – soap that reminds you of booze, or vice versa.
Cap it, and have a beer
They say that art is subjective and that’s so true – what’s art for one person is trash for another. So once you have used those beer bottles to do this, you might be left with the caps. Or you may just be a beer cap collector who goes bar hopping all over town just to try new beers and get the caps.
To make this piece of art you’ll need to buy borderless chalkboards (or blackboards), a good silicone adhesive and of course, chalk. Start by gluing the beer caps at all four corners of the blackboard. Now fill in the borders with more caps, making sure they are equidistant and don’t have any significant gaps or overlaps in between. Let the caps dry and set – now use the chalk to write witty one liners as per your liking. A great décor idea for kitchens or bars -- all you need to do is wipe off and start afresh.
A rather romantic mantelpiece
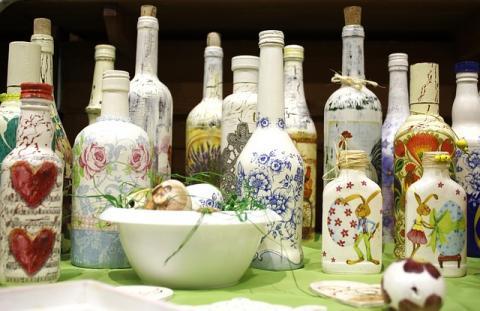
Scratching your head over a personalized gift for a special someone? Just raid your recycling shelf for wine bottles and dig into that fabric chest for pieces of lace, jute, twine, silk and any faux jewels or pearls you have at hand. The first thing you will need to do is make sure that the bottles are washed and dry, inside and out. Now, mix a soft pastel shade of your liking with some gloopy glue (as Mister Maker calls it – basically any kind of synthetic rubber adhesive) and paint the bottles with this mixture. Let the bottles dry. Use silicon-based adhesive to stick on the fabric pieces of your liking onto the bottles – creating lovely, lacy patterns like the ones shown above. You may also choose to add in some initials – the picture above spells L-O-V-E – but you can even spell out a name, using as many bottles as it takes.
The put-together vase
You can do this with bottles of any kind – all you have to do is thoroughly clean the bottles first, making sure that the label and the base glue have been completely scrubbed off. You don’t want icky vases to be prettified.
Next, stand the bottles in a triangle, fitting them such that they do not clink around or have space in between. Now tie them up with a string. Using some twine and plenty of heavy-duty silicone adhesive, stick them together by gluing the twine all around them in multiple stacked layers. Make sure you glue the twine tightly so as to have no play in between the bottles. You may choose to use different sizes of bottles for this – just make sure they fit together neatly. Now just fill them up with water and add in flowers of different shapes and sizes for a put together vase, that’s still a head turner.
A unique lamp
Simple to make, and so pretty to look at – all you need to make this easy-peasy but bright craft idea is an empty wine bottle, colored glass pebbles (use the flat ones since they will have better sticking power), silicone-based adhesive and a string of fairy lights. The first thing to do is to make sure the bottle is washed and dried – devoid of any smells and moisture. Insert in white fairy lights (or any color of your choice) and make sure it’s messy and fills the bottle to the brim. Now start gluing colored glass pebbles (the ones we use as vase fillers) to the surface of the bottle – make sure you have the pebbles in varying sizes to ensure even the neck of the bottle is covered with them. Let the glue dry.
Put this fairy lamp where you want some conversation, intimacy and perhaps even some more wine and switch it on for the magic to happen.
Clear bottle nebulae
Fascinated with space? Or have a certain someone wanting to grow into an astronaut? Either way, making a bottle nebula is easy, not particularly time consuming and yet fascinating enough that you may not even want to give it away.
What you will need is fabric paint or food coloring in different shades that also mix well – think of space – choose blue, green, red and yellow. You will also need silver glitter, lots of cotton balls and water. Take a disposable cup and mix in a little food coloring with water, in the hue you want. Now drop in a few cotton balls into a dry glass bottle and then pour this color over the balls. Add in some silver glitter and mix it in with a stick. Drop more cotton balls on top and then add in water color in another shade. Repeat till the bottle is full – and you have beautiful, gently moving nebula with varying shades and hues. Remember to cap or cork the bottle tight.
So there you have it, really cool DIY ideas that make you love your tipple even more. Write in to us with your comments, ideas or feedback in the comment section below. Happy Festivities!


