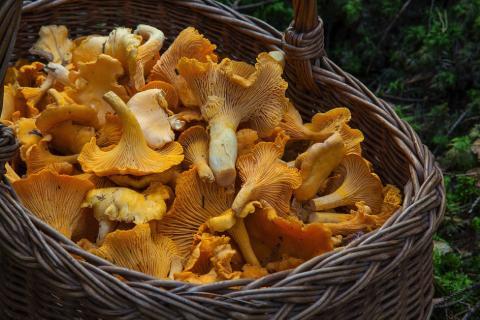
Mushrooms are a delicious superfood fungi used to serve many purposes. They contain a low amount of calories and are often packed with protein, nutrients, and fiber. Growing your own can be better, safer, and cheaper. So, why not try and grow your own organic edible mushrooms? They are actually a lot easier to grow than you think. Follow these 8 steps and learn how to grow your own organic edible mushrooms.
Things you will need:
- Mushroom Spawn (plug or sawdust)
- Small Thick-Bristle Brush (log cleaning)
- Drill
- Hammer (for mushroom spawn plugs only)
- Organic Melted Beeswax *To melt beeswax, use an electric wok or double boiler – beeswax is very flammable*
- Clean Paint Brush (for beeswax)
Step 1: Choose Your Spawn
Mushroom spawn is specifically used to grow mushrooms. You can choose and purchase organic mushroom spawn from most local gardening stores and online, or even at some farmer’s markets. There are many different kinds of mushroom spawns that can be purchased. The two forms of spawn are cork spawn or sawdust spawn. Here is a list of a few edible organic mushroom spawn choices to choose from.
- Chanterelle
- Enokitake
- Turkey Tail
- Oyster
- Shitake
- Maitake
- Lion’s Mane
- Reishi
Step 2: Pick a Log
Find or purchase a recently cut or fallen tree log from an organic source. Sawmills, tree nurseries, your own tree, or your neighbor may be able to provide a hardwood log. A few of the tree log that are compatible with the mushrooms mentioned above are oak, beech, maple, elm, and sweet gum. It is preferred by most growers to use logs about 4 to 6 inches in diameter. Although, you can use smaller or larger sizes if you desire.
Step 3: Clean and Seal Log
Grab the thick bristle brush and clean off surface of the log. Seal up any bare-cut ends or areas by brushing on beeswax so that other funguses will not try to compete with your mushroom spawn.
Step 4: Drill Holes into Log
Drill holes diagonally in a diamond-like pattern; 8 inches apart lengthwise and 4-6 inches apart in width. For most mushroom spawn plugs, the holes will be 5/16 inch or 7.9 mm, but some sizes may be different. This drilling size will also work for the sawdust spawn as well. Usually most spawn come with their own directions and measurements, but if they don’t, try the size mentioned.
Step 5: Place Spawn in Holes
Hammer in the mushroom spawn plugs until they are flush with the outside of the log. With a clean paint brush, brush melted beeswax over the spawn to seal them in. If you are using sawdust spawn, you will need to fill the hole up flush with the log and then quickly seal the hole by brushing beeswax over it.
Step 6: Designate a Location
Choose the best space for placing and storing your logs to cultivate your mushrooms. The best location would be an area where the log can get partial shade and partial sun. Place the logs vertically up against something.
Step 7: Observe Regularly
Watch and observe your mushroom spawn log regularly. It may take anywhere from 6-18 months to see any mushrooms sprout or produce.
Step 8: Harvest
When you see them starting to grow, harvest them within one week because if you wait longer, they start to spoil. You can harvest them by twisting or cutting them at the base. Depending on the size of you log, each one could produce about 1 and a ½ pounds a couple times a year. Another beneficial tip is to push your log and allow it to fall down on the ground. This kind of activity is said to enhance the spawn growth, especially before it is about to rain. Although most inedible mushrooms do not grow from logs, it is always good to make sure that you are harvesting the mushrooms that have sprouted only from your inoculation spots.
There are other ways to grow mushrooms, but I have found this method to be one of the most effective and sustainable way to do it. I encourage you try this out, and comment about it if you can.
Stay tuned for more organic home gardening tips and ideas.