Bats often get a rep for being scary creatures of the night. But bats are actually super beneficial to your garden! Not to mention they play an important role in the ecosystem and are considered pollinators. Here's how and why you should build a bat house and welcome bats into your garden.
Bats Are Beneficial
Trust me when I say, you want bats in your backyard. One of the reasons you’ll want them around is because most North American bats eat insects and can gobble up over 1,000 mosquitoes per hour. Isn’t that insane? As someone who frequently gets bit up by mosquitos, I wouldn’t mind having a few bats around to help me out. That means an average colony of 75 bats can eat up to 75,000 insects in just 60 minutes. If that’s not natural pest control, I’m not sure what is! There are even more perks to having bats around though: Bat droppings. As gross as it may sound, their droppings act as natural, nutrient-dense fertilizer, meaning your garden will thrive. Oh, and bats can be pollinators too. Depending on the type of bat, they’ll feed on flowers (their nectar and flower parts), along with fruit. In fact, over 300 species of fruit depend on bats for pollinator. Not to mention the agave plant also depends on bats to pollinate it. So, in other words, there are several good reasons to attract bats to your home.
How To Attract Bats To Your Yard
Now that you know why bats are beneficial, how can you attract them to your neighborhood? Well, like all animals, bats need food, water, and shelter. However, it’s good to know exactly what kind of bats live in your area first, in order to determine a more specific way to attract them. If you live in an urban area, it may be a bit harder to spot them. I recommend talking to a local bat enthusiast, or doing a little research on the bats in your area online. Just search “bats in [your state]” via google and see what pops up.
Generally speaking, though, I recommend having some kind of water source on hand. Maybe consider investing in a mini pond, birdbath, or fountain. This will help attract bats to your yard, as bats can lose 50 percent of body weight in water in a single day. That means they need to hydrate!
Another way to attract bats? Your garden of course! Bats love fragrant, night-blooming plants that attract nocturnal insects. Some great plants for the job include moon flowers, honeysuckle, evening primrose, thyme, raspberry, dahlia, datura, four o’clocks, French marigold, and nicotiana. Any pale-colored blooms have a decent chance of bringing in bugs, so definitely go with those.
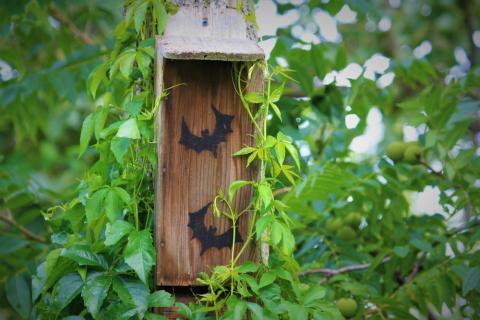
Building A Bat House
Perhaps the most important step in attracting bats? Building a bat house. They need a place to roost! You can buy one online if you don’t consider yourself handy, or at your local home improvement store. However, you can also try to DIY your own bat house.
If you plan on making your own bat house, first choose the right location to put it. You’ll want to mount it on a pole, or the side of a building. Don’t mount it on a tree, because then bats will be easily accessible to predators. Also, the bat house must be high enough because bats need height to drop down before they catch flight. I recommend putting the bat house at least 15 feet up. Keep it on the smaller side too, because bats like narrow tight spaces. Bats also prefer warmer conditions, so make sure the bat house is facing south to southeast if possible—this will help make sure the bat house heats up when the sun rises.
How To Build A Bat House
If you’re looking to create your own bat house, here’s a DIY to try:
Materials:
- Red oak plywood
- 2 pieces of cedar fencing
- 1 piece of 1” x 2” x 8” cedar for the sides
- Exterior screws (1-1/4")
- Caulk
- Leaf gutter guard plastic mesh
- Heavy duty stapler with staples
- Ebony stain
- Miter saw
- Jigsaw
- Circular saw
- Power drill with drilling and driving bits
- Lint-free rags
- Scissors
- Measuring tape
Measurements & Cuts:
- 15” x 34” red oak plywood which will make up the back of the bat house
- 6 pieces of 15” cedar boards cut from the cedar fencing boards
- 2 pieces of 1” x 2” x 4” (just cut the 1” x 2” x 8” in half)
- 3/4" thick piece of wood 13.5” long
Directions:
- Measure and cut the wood for your DIY bat house.
- Sand all wood pieces smooth. Every cut piece must be smoothed out—you can use a 150 grit sandpaper to get the job done.
- Stain the interior of the bat house ebony or dark brown. The interior needs to be warm for the bats, and making it a darker color will help with that. It helps retain the heat.
- Choose whether you want a sloped or straight bat house roof. If you want a sloped roof, cut the sides at a 10-degree angle, then cut one of the long sides of the roof cedar board at 10 degrees, and one long side of the front cedar board at 10 degrees. It’s best to bevel the edges before applying the dark stain.
- Attach the gutter guard mesh using staples. This will help ensure the bats have something to climb up on to get in the house. You’ll also need to attach the mesh to the backside of the front cedar board pieces.
- Bats need ventilation in their bat house, so be sure to leave a 1/8” to 1/4" space between the bottom and next to last cedar board pieces which comprise the front of the bat house. Leave that spacing when attaching the mesh.
- Next, glue or nail that 3/4" thick piece of wood to the bottom cedar board on the front. This will help create a smaller opening in the bat house and prevent predators from disturbing the bats.
- Screw the bat house together. Using the exterior screws, assemble the bat house. Before you screw it together though, make sure you caulk along all the seams first. The bat house needs to be water resistant, after all. You’ll also want to drill pilot holes, which are little starter holes, especially when dealing with cedar. You don’t want the delicate cedar splitting. Also, the legs will likely be a little too long, so you can cut them using a jigsaw.
- Sand the bat house. It’s good to give it another sanding, using an orbital sander (220 grit sandpaper by hand will work just as well).
- Since you should hang your bat house at least 15 feet off the ground, I recommend attaching a French cleat using glue, then securing it with exterior screws.
- Stain the outside of the bat house whatever color you want—a nice mahogany stain is a good idea. If you want to get creative here and add a stencil, or any other décor, feel free to do so. Batman decals, anyone?
Making your own bat house sound like too much of a hassle? Try buying one at your local home improvement store instead.